


Installing Ruger factory Rings
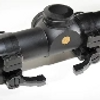
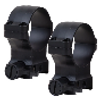
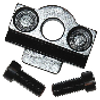
Proper installation of Ruger factory scope rings is crucial to a lifetime of trouble free service. Whenever I get a rifle in the shop with the complaint that "it just won't shoot any more", it often is due to an improperly installed ring or improperly torqued ring screws. The old adage "We don't have time to do it right but we have time to do it over" applies. The integral scope bases found on Ruger firearms nicely eliminate one of the causes of erratic groups; namely scope base movement caused by screws that have worked loose over time. Verify the Rings It is a good idea to verify that you have the correct scope rings for your Ruger firearm. Ruger manufacturers two groups of firearms; one group uses the same height ring front and rear and the other group uses different heights because the integral firearm bases are not the same height. Additionally, your specific scope will further determine the correct ring heights. It is a good idea to visit the Ruger website and verify that you are using the correct height rings for your firearm as well as the correct height rings for your scope's objective lens diameter. A note on Ruger ring heights: Ruger 1 inch rings are offered in 4 heights #3-#6 and the 30MM rings in three heights #4-#6. The heights change in 1/8 inch increments. If you have not determined the proper rings and ring heights for your firearm/scope combination, visit the Ruger site shopruger.com and make this determination using the 'scope ring finder'. Develop a System Applying a consistent and principle-based technique to scope mounting will give excellent results. Although not absolutely necessary, I like to use a quality torque driver with the appropriate size bits so that screw tensions are constant. The Wheeler Engineering F.A.T. Wrench has served me well for this use. Proper leveling of the scope to the receiver is a must and I like to use the Wheeler Engineering crosshair leveling kit for this. A scope lapping tool can be purchased from Brownell's to ensure the rings are concentric which eliminates stress on the scope caused by misalignment. Friction paper for the inside surface of the rings will finish the job anchoring the scope in the rings, a must for any firearm that has recoil. Before you start, verify that the firearm is unloaded and, when possible, remove the bolt. Observe safe firearm practices at all times. The much used warning that failure to do so may result in grievous bodily injury or death applies here and Alaska Arms LLC shall not be responsible for injury, death or damage to property from misuse or improper installation of Ruger scope rings. Secure the Firearm and Prepare the Components Place the rifle in a secure gun cradle if you have one or in a bench vise if you don't. If you are using a bench vise use padded jaws and be careful not to over-tighten the vise damaging the stock. Omitting steps will result in a less than desirable installation. Take your time and follow these directions and you will have as perfect an installation as is possible. Verify that the receiver and rings are clean and free of any burrs or nicks, lightly stoning if necessary to true the bearing surfaces. As a side note, compact scopes tend to be too short for long magnum receivers. Visually verify that the front ring can be mounted on the scope in a position that provides correct eye relief. If not, you might consider a Leupold offering through their custom shop. It is a long tube fixed three power made specifically for long magnum actions. I think they are a bargain at around $300.00 that includes your selection of reticles. Installing the Lower Ring Assembly Place the front ring lower assembly over the integral receiver base aligning the recoil tab on the bottom of the ring with the cutout in the receiver. Push the ring forward towards the muzzle as you torque the windage screw on the bottom of the ring to 40 inch-lbs. Rings shift forward under recoil and this eliminates one of the causes of a drifting point of impact when a scope is first installed and sighted in. The section of the screw that clamps into the receiver dovetail cutout is as cast and tends to bite out of alignment if the bottom of the ring does not make full contact on the dovetail. This point was driven home after a hunting companion took a nasty tumble down a hill and had his point of impact shift up 3 feet at 100 yards. This was not discovered until later in the hunt when he took careful aim for a heart shot on a moose facing him at about 75 yards. He hit his trophy squarely in the forehead and ruining the skull plate on a nice set of antlers. The windage screw had shifted relieving all clamping force on the rear ring. Repeat this process when installing the rear ring lower assembly. Lapping the Rings Now is a good time to lap the scope rings inline with the receiver. This step eliminates all undo stress on the scope tube and extends scope life. Carefully follow the manufacture's instructions for lapping. Brownell's offers these handy tools to lap 1 inch and 30MM rings as well as a full assortment of lapping compounds. Rarely will you find both rings in perfect alignment making these laps a worthwhile investment. Misaligned rings tend to twist and bend the scope tube as it is tightened in position and if the misalignment is severe enough it can cause the scope to lose it's seal. Misaligned rings also cause receiver stress that has a negative affect on accuracy. These problems are resolved by properly lapping the rings. Installing Friction Paper Prior to installing the scope in your newly mounted and lapped rings, place friction paper on the inside mating surface of both the ring bottom halves and the top caps. Small address labels work well in a pinch. The inside surfaces on Ruger rings are quiet rough and tend to scuff the contact area on the scope. Mounting and Aligning the Scope Place the scope in the rings making certain that the only points of contact with the firearm are the rings. The front (objective lens) must clear the barrel and rear sight. Establish eye relief and level the cross hairs using the leveling kit made by Wheeler Engineering or one of the other leveling devices available. This will eliminate a lot of frustrating trial and error guessing. The Wheeler kit is a simple set and includes a level that is placed on the receiver and second level that is placed on the scope. First the action is leveled and then the scope. Crosscheck between the levels making certain they have not shifted during the installation. A gentlemen brought me his rifle after he installed a set of rings complaining that although he had done a perfect installation the gun was way off at over 100 yards. The problem was easy to find, he had rotated the crosshairs a good 10 Degrees out of alignment during installation and had to cant the rifle to bring them in when shooting, thus placing the scope out of alignment with the bore. Install the top caps over the scope tube and reset the torque driver to 20 inch-lbs. Now, using a crossing pattern and alternating between the front and rear ring, torque the screws. Be careful to maintain an even gap between the top caps and the bottom halves of the rings. Once the installation has been completed recheck crosshair alignment with the levels one last time and adjust if necessary. Bore sighting A quality Boresighter is a good investment and will save you time and ammunition. Lacking one you can place the rifle in a secure rest and sight through the bore at a distant object or light and without moving the firearm adjust the crosshairs to the same object. This will get you on the target at 25 yards. Your firearm is now ready to be sighted in with live ammo at the range. Safe hunting, Morris Melani


