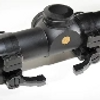
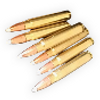
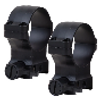
News

September 19, 2014

Posted in


Custom installation of Alaska Arms LLC scope rings

American Custom Gunmakers Guild member James Tucker used Alaska Arms LLC gunsmith bases and the CZ quick detachable scope rings on this custom Mauser rifle.  These rings are ideally suited to this application as they are sleek and highly reliable for returning to zero when the scope is removed and reattached.

September 19, 2014

Posted in


Alaska Arms LLC scope rings in Africa

Alaska Arms LLC quick detachable scope rings are ideally suited for hunting dangerous game in Africa where changing conditions may require removal or attachment of a scope.  These rings return reliably to zero every time.

Additionally, assurance that the scope will maintain its zero allows it to be removed and hand carried as the Jeff Bryson proved.

“The detachable rings for the CZ .416 Rigby worked great. I am the guy from North Dakota, we talked once on the phone before the trip, a gun was sighted in and scope removed so I could take in my carry-on. Got to Limpopo region of South Africa, put a scope on to check zero, and Right on! Great product. Anyone can contact me about your system. Thank you.”  Jeff Bryson.

Ovate Barrels Part 4

Part 4 The Takedown System

Before the ovate barrels can have profiles cut for this project the takedown system needs to be cut on each barrel.

The BSA Martini takedown system consists of a tapered screw that passes through the action from left to right perpendicular to the axis of the bore.  The taper of the pin mates with a cut on the underside of the barrel threads and as the pin is screwed into the action the first thing that happens as the screw is engaging this barrel cut is that the barrel is rotated into the top dead center position until the screw surface and the barrel surface are fully mated.  As the screw is then fully tightened the barrel is pressed firmly upwards into the upper parts of the action treads ‘locking” the barrel to the action.  There is nothing particularly sophisticated about this system but having studied some of the other British takedown systems it is svelte and reliable.

The problems associated with implementing this system on a four-barreled project were evident.

First, how to use a common pin for all of the barrels.  Multiple barrel-specific parts present a problem because if lost, the efficacy of the system is diminished.  Two breach blocks and two extractors would be needed already and I did not want any more duplication of parts.  I wanted to use a lever on the takedown pin that would index straight down when torqued in for each barrel.  A lever would afford the luxury of not having to have a screw bit readily available for barrel change outs.  Morris thought that EDM gave the best opportunity to control this part of the project.

The takedown screw was secured in the vise of an optical comparator and the taper of the pin was established as 4 degrees.

I had rough turned four takedown blanks out of O-1 tool steel and Morris brought each to near final dimensions on the lathe and threaded each.

Graphite rods 5/16” in diameter were then secured in a Harig fixture and dialed in.  This set up was moved to a sine plate set to give the appropriate 4-degree taper.  Using a surface grinder, four EDM electrodes were cut that duplicated the profile of the takedown screw.

To reduce the EDM time needed to cut the groove in the bottom of the barrel threads the barrels were placed on two V blocks and loosely secured.  This setup was moved to the mill, the action was screwed to the barrel with the slightest snug up.  This setup was then dialed in using the side of the action.  The sides of the action had previously been precisely surface ground to a thickness of plus or minus .002”.  Once dialed in and secured in the fixture a 3/16” end mill was centered in the takedown screw hole, the action was removed and a rough cut of the groove was cut through the threads.

A second mill cut was done while the barrel was secured in this setup.  A 3/4”X1 1/2” section of the barrel about 4” forward of the action was milled.  This flat on the left side is 90° left of top dead center for the barrel and will be used for the CNC set up.

A reliable method of controlling the depth of the EDM cut needed to be established and this was done by screwing the takedown pin tightly into the action.  The action was then set up on the surface grinder and the head of the takedown pin was flat.  The original BSA barrel that came with the action was then screwed in, the takedown pin was screwed in and brought up tight and then backed out 1/2 turn.  The width of the action from the right side to the top of the screw head on the left was measured and this would become the desired depth for the EDM cut.

The barrel still secured in the v block fixture was then moved to the EDM where the tapered electrode was already installed.  The side of the action was dialed in and the mill-cut flat on the barrel (can be seen in this photo) was used for a cross-check verification.

The setup was then secured, rechecked and then the takedown pin hole was positioned under the electrode.  The electrode was lowered so that it could be brought into contact with the threaded portion and alternately touching off in the x-axis and y-axis the center position was established for the center of the pin.

The action was unscrewed from the barrel and the EDM process was started.

Checks were made periodically to gauge depth progress by raising the electrode, screwing the action onto the barrel, screwing the takedown pin in and finally measuring the width.  The final result looks very good and is quite repeatable to ensure tight tolerances from barrel to barrel.  Light hand stoning will be used for the final fit.

The CNC setup will be covered next starting with design of the fixtures.

Ovate Barrels Part 3

Preparing the Action

Since the miniature Martini breach block’s face is not perpendicular to the axis of striker travel conversion of a rimfire block to centerfire uses two dial-in references.

The dial-in with a snug fitting gauge pin in the block striker bore will be used for three operations: 1) the EDM setup to remove the striker nut retaining screw that was broken off in the hole; 2) tapping the original firing pin hole; and; 3) drilling the new firing pin hole.  This is what the setup looks like.

The rimfire breach block that is being converted to centerfire was secured in a tool maker’s vise and was dialed in on a surface plate as shown above.  The setup was moved to the mill and a 4-40 tap was used to thread the existing rimfire firing pin hole to the full depth of the hole.  A 4-40 bead blasted screw was then screwed into this hole leaving the screw proud of the breach face.  The circumference of the protruding screw was TIG welded to the breach face.

The block was then set up again in the tool maker’s vise and the block face dialed in.  The setup was then taken to the surface grinder.  The protruding part of the screw, as well as the bead of weld surrounding it, were brought a level with the face.

Preparatory to locating the new firing pin the existing firing pin was ground from the striker nearly to the striker flange. Again the block was dialed in on the surface plate with the gauge pin in the striker bore and with the vise turned onto its side the new firing pin hole could now be drilled.  The new firing pin location is off center of the axis of the striker but this setup would ensure that the new firing pin would be parallel to the striker axis and would not bind as it travels longitudinally back and forth.  The center of the barrel axis had been previously established with the block installed in the action and this center was marked on the breach face. The setup was moved to the mill and with the striker installed in the block under full tension of the striker spring a 1/16” hole was drilled through the breach face and into the striker flange.  This spotted hole on the striker flange would then be center of the new firing pin location.

A section of 1/16″ O-1 drill rod was soldered into the striker and after the parts of the breach block unit were reassembled the firing pin was shortened and then rounded to give a pin protrusion of .055”.

The last work that needed to be done on this block was a removal of the striker nut retain screw.  The block came to me with this screw broken off and I drilled the screw out as best as I could.  It is something like a 5-56 screw and after drilling the screw with a still smaller twist drill there were thread remnants that I thought I could remove with the tap.  I broke the tap off and Morris used the EDM to remove the tap.  The threads were then carefully cleaned up and the new screw fitted.

Preparing the Barrels

By now we had four ovate barrels that needed fitted to the action.  The preparation consisted of work that I am simply not capable of doing even with the excellent machines made available to me.  This was Morris’ show and I gratefully moved aside.

The first problem was that the exterior of each barrel was rough.  Two of the barrels had not been rough turned on the exterior and these not only had significant rust on the exteriors but the bores were noticeably off center in the full round blanks.  The other two barrels also had bores that were off center but not to the degree of the other two.  All had bores that were remarkable straight so work on them proceeded.

Morris set the barrels up on the lathe on centers and carefully trued a section on each end of the barrel to be concentric with the bore.  Very precise tolerances were maintained for this operation.  As each barrel was held between centers very light skim cuts were performed on each barrel until the outsides were trued to the axis of the bore.

Using the trued section on the breach end of each barrel as a reference point the overall length of the barrel set was established at 26” and each was precisely brought to this length.

Morris’ description of process:  “After the shortest barrel had been faced on and had centers cut on both ends I stood it on end on the surface plate. The rest of the barrels were faced on one end and had center cut I stood them next to the finished barrel and used a depth mic to determine the amount to shorten the remaining barrels. This resulted all barrels being within .005 of the same length.”

Each barrel was crowned at the breach and the muzzle.

Morris’ description of process: “Total run out with the barrels chucked in the 4 jaw chuck was .0002/ the ends of the blank were faced and a 60 degree center was cut in the end using a boring tool feeding the tool from the bore out to draw burrs out that result from turning. The barrels were next placed between centers with tailstock pressure only and a 2 inch section was turned concentric with the bore. after this step it was possible chuck one end of the barrel in the 4 jaw chuck and indicate both ends of the barrel. The center was then used to support the barrel and the entire outside was turned concentric with the bore.”

The action barrel tenon was cut on each barrel and this tenon was threaded using a 55° tool.  The leading edge of this tool was rounded manually to produce the appropriate Whitworth thread cut in the action.

Morris’ description of the process: “A 55° threading tool was ground on the surface grinder that allowed the thread to be machined to the shoulder eliminating the relief cut and allowing the threads to be turned to the shoulder adding strength to this critical area.”

Morris made a tool fixture for cutting threading tools using the surface grinder.  This is a very precise fixture that gives extraordinary tools.  Because this one is set up for cutting a 60-degree angle a sine plate needed to be used to reduce it to the required 55°.

Each barrel was then threaded to give a consistent snug turn-in to the action face.  With this takedown system using four barrels, it is important to have precise tolerances from barrel to barrel.

Finally, each barrel was then chambered using a floating reamer holder in the tailstock.

Morris’ description of the process: “The chambers were cut to a feel on the go gauge + .001 shim stock. The chamber reamers were removed as soon a the chips were showing in the flutes dry. The reamer was then removed, cleaned and thoroughly oiled. several dry patches were run through the bore.  The reamer and copious amounts of oil were reinserted and the entire process restarted.”

Each barrel was screwed into the receiver with its appropriate breach block installed and firing tests were conducted to ensure primer ignition.  Because the head diameters of the .22 LR and the .17 HMR are slightly different I had some concern about whether the rimfire block firing location set up for the .22 LR would detonate both the .22 LR and the .17 HMR cartridges.  Both tests resulted in detonation and the conclusion is that no adjustment to the location of the rimfire firing pin is needed.

Using the EDM to cut the takedown screw groove on each barrel’s thread bottom will be covered next.

Ovate Barrels Part 2

While waiting for arrival of the full round .17 caliber barrel I did some preliminary work on the action as well as some of the preparations for the stocking. I made a fixture for lapping the faces of the breach blocks.  This is a simple threaded stub (14 t.p.i. .750″ threads) that has a bore of .375″ to accommodate a drill rod lap.  I started with 320 grit lapping compound dabbed on the end of the lap which was slowly rotated with a hand drill.  This created shallow ‘ruts’ so I used contact cement to attach 600 grit wet or dry paper on the tip and adding a drop of oil a smooth finish was achieved.

To convert the second rimfire breach block I planned to follow the method used on a Hoffman Arms #12 Martini that I have.  It has a simple dovetail cut across the breach face from side to side through the existing firing pin hole.  A dovetailed blank was then secured in the cut.  The firing pin was then ground from the striker, the striker was replaced in the block and the new centerfire pin location was drilled in its new location through the block face and into the striker face.  A new firing pin was then fashioned and soldered into the striker.  This new location is just below the center of the striker axis.

This arrangement works well but Morris devised an alternative. He completed the first part of the conversion by threading the existing rimmed firing pin hole in the breach face with a 4-40 tap.  A screw was then turned into the threaded hole, cut nearly to the face of the breach and TIG welded around this screw protrusion on the breach face.  The face was then surface ground and finally lapped.  The new firing pin hole will be drilled with a 1/16″ twist drill and a new pin will be fashioned from 1/16″ drill blank stock and soldered into the striker.  The striker axis is not perpendicular to the face of the breach block so care will be needed when clamping the block properly for this operation.

The small BSA Martini actions have a heavy, thick through bolt and I wanted to replace this with a smaller 1/4″ one.  I started by mading an insert that was threaded on the outside to fit the screw hole in the back of the action and that was center drilled and threaded for 1/4″ 20.  A new bolt was then made that had a head diameter of 5/8″.

In Part 1 the issue of a small size of the butt stock blank as well as a bit of sap wood was discussed.  The entry and exit holes for the through bolt were located so that the dimensions of the Hoffman Arms Martini could be nearly duplicated for this new rifle.

Two gun drill type tools were made from O-1 drill rod, the smaller 5/16″ in diameter and the second had a 5/8″ end section soldered in place, and they were then hardened.  The smaller drill was chucked in my metal lathe, the blank was pinioned between centers and the drill was inserted about 4″ from each end.  Because the flutes of this drill don’t clear chips well, slow steady pressure was needed and the drill had to be withdrawn frequently to remove the chips.  The blank was then secured in a bench vise and the final drilling was done with a 3/8″ chucked hand drill.  When I broke through near the center of the blank to the hole from the opposite end there was only the slightest resistance felt so this gave a very straight hole.

Using the second drill with the 5/8″ head that has a short section of the 5/16″ rod protruding from its face to act as a pilot, the 5/8″ section of the hole was drilled.  This was a very slow process and required that the drill be removed frequently to clear the chips.  This resulted in a clean cut and concentric hole.  The final step was to make a 1/8″ thick washer that was .625″ in diameter which was set in its permanent position at the bottom of the 5/8″ section of the hole.

The butt stock was then inletted into the rear of the action.

Each barrel will have its own fore arm and the blanks that I had were difficult for me to picture the best layout.  I turned each to a full round on the lathe and this made the task much easier.  A 15mm tenon was turned on the front of each blank, a Forstners 15mm bit was used to drill a hole 3/4″ deep in the end of each of the horn tip blanks that I had and then they were attached with cyanoacrylate glue.  Each was then roughed to shape and will be inletted when the barrel profiling is done.


The lever was heated and forged to shape and then inletted into the butt stock.  Lever tip treatment will be done at a later date.  Final dimensions for the butt stock will be established after one of the barrels is completed.


The action surfaces had a uniform roughness generally described as patina.  I’d call it very fine surface corrosion.  Morris surface ground the sides and the face of the action and I did the preliminary finish to 220 grit by hand.

Precision of Alaska Arms LLC CZ Rings

My name is Dane Sorensen and I live in Perth, Western Australia.  I’m a past customer of yours and have a tale I’d like to share with you.

Right – a little story about scopes mounts and new rifles. I purchased a new 375 H&H CZ Safari in mid 2013, and shortly after, ordered quick release mounts from Alaska Arms in both 30mm and 1 inch, which duly turned up a few weeks later, as explained, due to production schedules. Great service, from the other side of the world.
In the mean time, wanting to get some loads sorted out and needing suitable mounts – I purchased 30mm CZ mounts to suit. In Australia, the gun does not come with the mounts supplied. These were used to mount an excellent Kahles 2.5 – 10 x 50 – however, when trying to zero the scope – I found that at the full extent of the adjustment of the scope, the closest I could get to the point of impact was 100mm – not at all a good result for a new rifle / mount combination, especially as both are from the same manufacturer.
Now, you might think the simple solution would have been to take the lot back to the dealer and let the importer sort it out. Well, I live in Australia, compared to the US, we have VERY restrictive licensing laws. As I reside in Western Australia the situation is compounded – here we need to apply separately for EACH fire arm, with supporting documentation outlining reasons for requiring a new firearm and it is a protracted process that takes up to 4 months – even as , in my case, I have other high powers and handguns.
To give up the gun for a warranty claim may well mean I don’t see the gun for – well, who knew how long. I persevered – the age old method of shim metal under the offending back mount – this got me on the paper and everything seemed OK even though I was somewhat disappointed.
After a couple of hundred workup reloads and the odd quick hunting trip which went pretty well, all seemed alright and I arranged a trip to the Nullabore, 600 miles East of Perth, my home town.
The first couple of shots were less than impressive – upon inspection, the mounts had come loose at the center pillar screws. Rarely do things under stress preform as hoped – for long. I should have both expected this and checked for it.
Upon close inspection and the application of vernier calipers, I came to the conclusion that receiver dove tails might not be in alignment, as the CZ mounts both measured precisely the same in all facets. At this stage, I was resigned to the warranty course. Then I read an article about scope mount alignment and honing kits – had a mate (buddy – OK (: .. ) turn some up and checked out where the problem really was.
Custom made mount alignment pins fitted into the Alaskan Arms 1 inch and 30mm quick release mounts. CZ mounts in foreground.
scope rings

First of all, I mounted the alignment pins into the CZ mounts, then refitted the mounts to the rifle – this resulted in the confirmation that there was .68 mm miss alignment between the pins, approximately half way between the mounts. Side alignment was checked using a straight edge and there was around .45 mm out of line on the side parallel. To be honest, this is a little bewildering as I ran the verniers over both CZ mounts and dimensions are identical between both mounts. Regardless – the alignment pins don’t lie – I rotated them through five steps of about 30 degrees and the miss alignment was constant.

rings on steel scope

Close up of CZ mounts with logo clearly visible.

close up of scope rings on steelI then remembered my Alaska Arms mounts, tucked away in my cupbord – beautifully presented in their tin case and wrapped in a velvet drawstring bag, each mount individually packaged in a moisture proof zip lock plastic bag, with simple straight forward instructions included. You might think I’m going on a bit about the packaging, but I believe it shows the devotion to quality you take with your product.

Not having to disassemble the rings as you do for scope mounting, rather simply loosening the top and bottom screws, it was a very simple job to mount up my gauge pins and attach the mounts to the rifle.
I did the 30 mm rings first and low and behold – almost perfect alignment. I thought this was too good to be true, so immediately fitted the 1 inch rings – same result. The miss alignment is less than 0.08 mm – if I was measuring it correctly – it ranged from 0.05mm to 0.12mm but most of the readings were around 0.08mm – in effect, nothing to worry about with both sets.
As mentioned – almost perfect alignment with the Alaska Arms rings on the same rifle
perfect alignment scope rings
At this stage, I’ve mounted the scope (the Kahles 2.5 – 10 x 50 ) in the 30 mm quick release rings. I’d centered the scope on both adjustments, windage and elevation prior to fitting and was keen to see how it came into line with the new mounts. I have a lazar bore sighting instrument so fitted it to my barrel and turned it on – at 50 metres (54 and a bit yards) it was within 50 mm (2in) – incredible considering my first debacle with the “genuine” rings. I removed and refitted the scope as per the quick release instructions supplied with the rings – same point of aim. I’ve yet to live fire to sight in, but this is an incredible result considering I couldn’t get closer that 4 inches with full elevation previously, using the CZ mounts with no shimming.
I will of course need to confirm results with live firing and will get a 1 inch scope of a fixed 2 or 2.5 power so I can assess both setups, and will continue this report in due course. I do however, have enough experience with things mechanical and optical as well as guns/shooting, to know that I can now expect the results I was hoping for when I first purchased this rig. It’s then my intention to submit this article (suitably edited and with the live firing results) to a couple of our Australian shooting publications in the hopes they’ll publish my story. I need to clean it up and will probably need photos of the 1 inch rings – I still have the pins mounted in them and as I can now confidently remove and replace my scope – this presents no problems.
Kahles Scope with rings fitted prior to mounting on the rifle.
Scope with rings fitted
Now, you may be wondering why it took me so long to get around to trying you rings. Well, in truth – I was convinced the dovetails machined into the rifle’s receiver were to blame – as I said, I’d run the verniers over the CZ mounts and prior to having the alignment pins made up, I was convinced they were OK. In part, this was confirmed in my mind because I’d mounted the Kahles with the front mount only, leaving the rear one loose, and it was free of the rear dovetail by about 0.8 mm. Obviously those CZ rings are …. well, they’re not good.
So Morris, in closing, let me say how absolutely pleased I am that I made the choice to deal with you, on my part, blind good luck although I did do some research – the fit and finish of your mounts is superb.
If you’re interested, I’ll finish the story when I’ve done some shooting.
In any case, my very best regards and thanks
Dane Sorensen
To check our our Ruger scope rings click here.

.400 Whelen Rifle Project

My .400 Whelen Rifle Project

Having paid little attention to American gunmakers' work on the 1903 Springfield, I'm overwhelmed looking at the many fine 1903 Springfield rifles in Michael Petrov's collection.  It will take more visits for the details of individual rifles and individual gunmakers to emerge and begin to form the details of a rifle I'd like to build.  This will be a .400 Whelen rifle project incorporating features I like most from a number of the rifles.

The first step would be finding a 1903 Springfield action. Michael pointed me to a rifle that was listed on a gun sale website and the price was right so I bought it.  The rifle has a Rock Island Arsenal action, a very nice early Lyman 48 receiver sight, an early Redfield banded front ramp and a steel Winchester Model 70 buttplate.  Only the action and the sights will be used for this project.

rifle

The barrel was removed from the action and the action was disassembled for clean up.  An action modification I'd seen on several of Michael's rifles that I liked was a contoured tang.  The rearmost width of the tang forms the base width of the new contour and this carries forward about 3/4".  From this point an arc of a large circle transitions to a point about 3/8" rearward of the left side of the rear action ring.

The top of the tang was smoothed with a fine pillar file and then coated with Dykem.  Using a circle template, the contour was scribed and files were used to remove metal to the scribe line.  A slight taper was worked into the tang by directing the file point slightly down and this will help get a good fit as the barreled action is inletted into a stock.

Here is the final of this reshape.

1903_tang_reshape Here is the final action polished and ready for the barrel installation. 1903_top_asmbl_2  

Nearly all of Michael's rifles are stocked in thin shelled walnut and that is my preference.  I found a blank at a reasonable price that has good layout.  The last major component that I needed to get was the barrel.

The thin shell California walnut blank EXV20_left-800  

A barrel length of 24" is the standard for Michael's rifles, this probably a result of many using the original military barrel.  The main chambering is the .30/06 Springfield, again a result of using the stock barrel.  The other classic cartridges are the .35 Whelen and the .400 Whelen.  This rifle will be a .400 Whelen.

Michael's rifle barrel profiles vary widely and the noteworthy distinction is the area directly in front of the action.  Most modern barrels have a cylindrical section extending  forward a short distance in front of the action.  Michael's rifles show a range of artistic treatment of barrel profiles. Some have a short cylindrical section just forward of the action. Depending on the gun maker this cylindrical section is followed by a short radius or a long radius.  The muzzle end of the radius connected to some point forward where a straight taper was applied thence to the muzzle.  To remove evidence of the rear sight spline, some of the barrels were turned just forward of the action and a collar was fitted that snugged up flush with the straight front ring of the action.

The Surkamer rifle is among my favorites both for the barrel profile and the stock profile.  The Surkamer barrel is 1.130" at the action, .829" at 7" and .606" at the muzzle for a taper rate of .013" per inch of step down.  Michael's .400 Whelen G&H has a muzzle diameter of .675".  The front banded ramp I got with my rifle is an early finely crafted Redfield that has an I.D. of .660" which is close enough to the G&H to accomplish the profile of a very early rifle in this chambering that also allows the use of the Redfield banded ramp that came with the rifle.

Michael's Surkamer Rifle Surkamer_2

Some weeks ago I measured the barrel diameters at one inch intervals of Michael's .30-06 Surkamer and his .400 Whelen G&H with the idea that I would use a profile for my .400 that was somewhat in keeping with an original rifle. I think these early profiles were a bit more robust than what is typically used today.

Morris Melani created two profiles in MasterCam from which templates would be machined on his HAAS CNC machine. The first template was a true recreation of the Surmaker .30-06 and the second a modified Surkamer for the .400 Whelen that would be sent to the barrel maker for tracing on the new barrel.

Morris creating the template solid in Master Cam.

Morris_mastercam This is the 24" long bar of steel from which the template will be cut. HAAS_template_setup2 Here are the templates: 400_barrel_template_2 Documentation was engraved on each of the 23.25" steel bar stock templates. 400_barrel_template  

The templates consist of a dial-in ledge set back from the profile and the template will be affixed to a tracer attached to a lathe and the profile will be cut into the barrel blank.

I'm was working with Dan Pedersen of Classic Barrel and Gun Works to make the barrel but repeated unanswered calls and emails to him to get the barrel done failed to get his attention and I went to Kreiger Barrels.  The template work was a waste of Morris' time and Pedersen still has the templates.